“Immediate access to our secure document management system.”
Already Registred ?
Please login.
Kodak Insite is an online system for downloading, viewing and approving your files before printing.
You can login into your customer account using your username and password that you have previously received by email.
This is an automatic e-mail system so please check your spam folder.
To obtain your customer login and password, you can also contact our teams at mail office@gunyfal.com.
To use our Kodak Insite module, you need to have java installed on your computer. It is mandatory on the other hand to use browsers Internet Explorer or Safari.
If Java is not installed on your computer, you can download it for free from www.java.com.
Procedure to upload your files
on our Kodak InSite server.
- The server address is gunyfal.org. Your password is in a system email, sent to your e-mail.
To go about it please ensure that you have Java on your system (if ever this is not the case, please free download from http://java.com/en/) then please visit: http://gunyfal.org
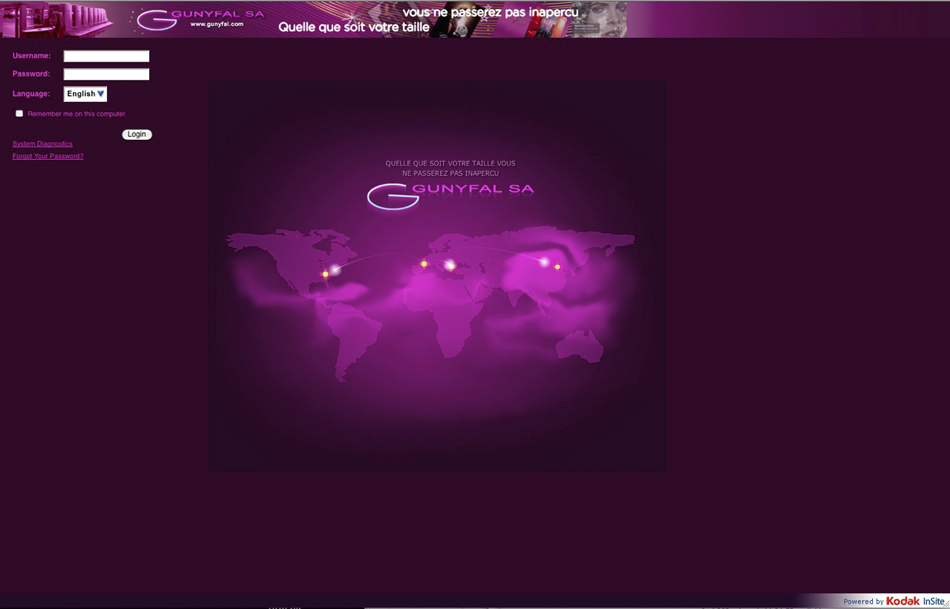
You will be prompted to log in (see image 1). - There is a “job” in your account with the name of your order.
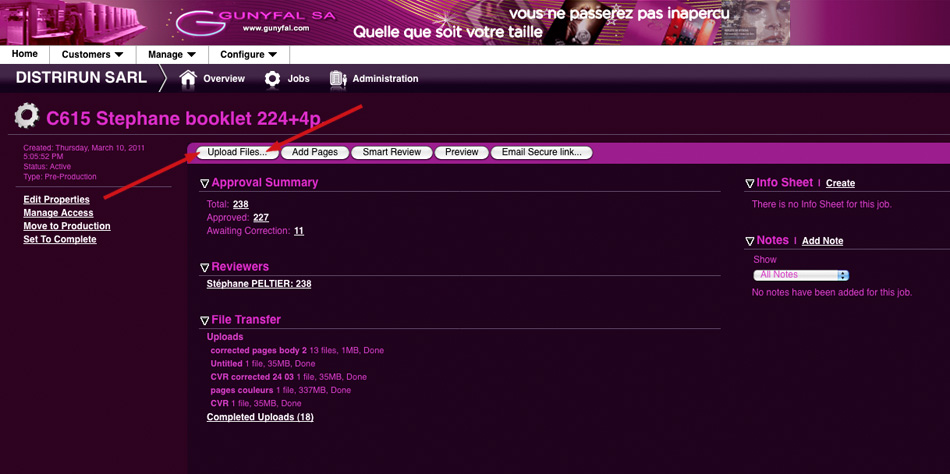
- Then press the button “Send Files” (see image 2).
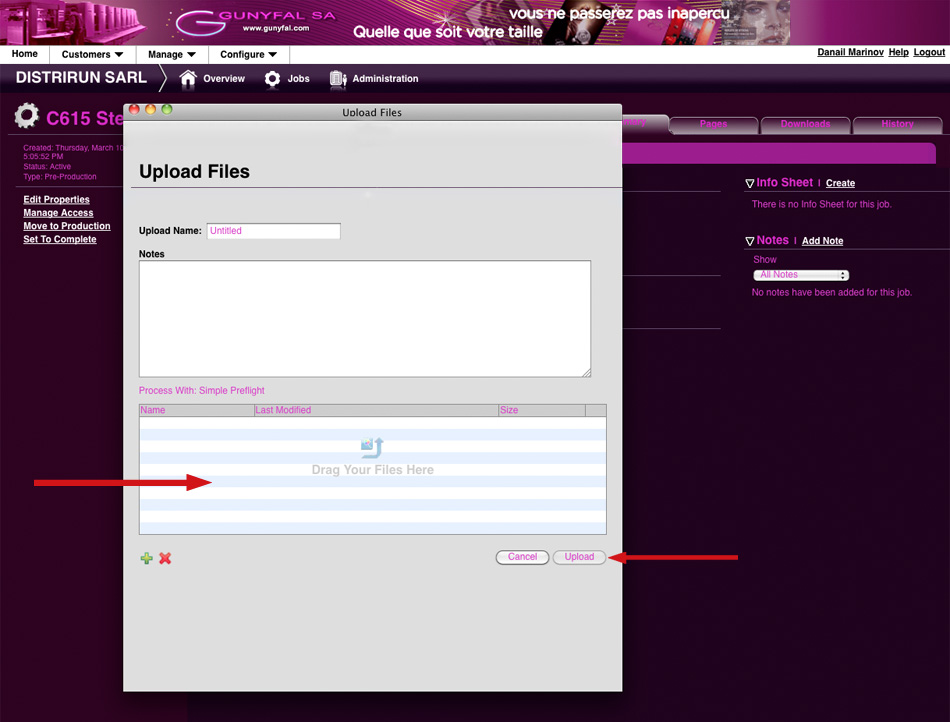
- A window will appear – please drag your files inside (see image 3) and press “Send”. You will have to wait (do not close the browser) the time needed to upload your files.
(image 1)
(image 2)
(image 3)
![]()
If there is some problem to connect with our server you can use an online service called WeTransfer – a free platform for transferring large digital files up to 2GB per transfer. No registration necessary. Click on the WeTransfer logo to get started.
Please share your files with us using our email address contact@gunyfal.com
FAQ
How to check if your computer can work with Kodak InSite?
Under the name and password window http://gunyfal.org, you will find the link “system diagnostics”. The system starts diagnosing your computer. You will receive a detailed report in which any problems will be indicated in red.
How to upload files to http://gunyfal.org?
Enter your username and password. Choose the job in which you want to upload files. Then choose “Send files”. – In “upload name”, enter the name of the folder in which you will download. In “Notes”, you can leave a comment or a remark. You can choose one of the two ways to download the file: By drag & drop, you can drag the files into the “Drag your files here” entry or with the green + icon, from which you need to Choose the necessary files. The files in your selection should appear in the “Drag your files here” window. By pressing the “Send” button, the download process is complete.
How to approve files on http://gunyfal.org?
Choose the job in which you want to approve the files. Then choose the Pages (“Approval Summary”). In the “Pages” window, all processed pages are displayed. Then select all pages and click approve.
How to prepare files for finishing processes?
The finishing process includes: hot gilding, embossing, selective UV varnish. Files must be prepared in “.EPS” or “.PDF” formats.
- Preparation of files for hot stamping:
In the folder, the object with hot gilding must be a vector image, given the color Pantone or SPOT with 100% density. In this case, it is possible to have CMYK color separation. The color should be considered as an overprint. The minimum size of the paper to which hot stamping will be printed is 115/100 mm. The maximum size is 770/560 mm. You should be careful about the points where hot gilding will be in contact with the colors of the image. It is necessary to have manual overlaps such as hot gilding is a “post-print” process. It is possible that there is even a minimal displacement or shift from the desired position. This overlap should not be less than 0.5 pt = 0.176 mm.
- Preparation of files for embossing.
In the files, prepare the embossing as an object – a vector image, given the Pantone or SPOT color with 100% density, this way it will be separated from CMYK colors. The color should be considered as an overprint. -The minimum paper size on which the embossing is to be applied is 115/100 mm and the maximum size is 770/560 mm. – –
- Preparation of files for Spot UV.
In preparing files for UV selective varnish, prepare selective UV as an object – a vector image, given the color Pantone or SPOT with 100% density. This way, it will be separated from CMYK colors.
Technical Requirements for Files
Accepted files: we accept files in “PDF”, “EPS” format. Make sure your files are high-definition, that your fonts and images are included and without any recording compression.
Resolution: The resolution of your images must be 300 DPI (pixel / inch). If you send us images of lower resolution, the print quality will also be lower. No complaint will be possible if you do not comply with this rule.
Colors: Your images must be in CMYK (Cyan Magenta Yellow Black) mode. Any additional color (eg pantone) or any other color mode of the images (RGB, LAB, indexed colors) will be automatically converted to CMYK. In the case of an automatic transformation, the colorimetric rendering will necessarily be different. No complaint will be possible on this point.
Page Format: The page size of the file must be in the final format of the document.
Bleeds: add a minimum of 3 to 5 mm of bleed to each side of your document (to avoid problems when cutting). In the absence of overflow, we will be forced either to include a white outline or a color outline depending on the type of your document without any complaint being possible.
Texts near the edge: Avoid putting text too close to the edges, leave at least 5 mm. Text or graphic elements too close to the edge of your document may cause cutting problems.
Ink loading: the ink load of the four layers must not exceed 300% in order to avoid problems of overloading ink and drying during printing. For example, to obtain a beautiful black we recommend you to support the black in the following way: Cyan = 30 / Magenta = 30 / Black = 100%.
Transparency flattening: If you have used plotting functions (clipping or mask), differences in opacity or other filters (brightness, merge, product, etc.) or an overlay of different graphic elements with different attributes, Imperatively flatten your images and control the result before sending it to us. For example, if you are using Photoshop software, you must flatten the image and carefully check the result of this operation. Similarly, if you are making a PDF file, you must flatten your images before converting them (do not force PDF or EPS if you have not previously flattened your elements).
If you use vector software (Illustrator, Indesign …), you must also flatten transparencies and validate (in high resolution). Then check that the result matches your original document (when flattening, some elements may react badly, you will have to go back to the original document and correct the problem).
Be careful, before flattening, you must make sure that no element or layer is locked that there are no elements in RGB, pantone, spot colors etc.
If you are sending a composition made from a QuarkXpress ® software, Indesign ®, etc. : Check that the images and illustrations imported into your layout software are CMYK or CMYK and not RGB (or other color separation formats). If you have used multiple layers on your original document, you must flatten them on the document you send us. Once all these operations are completed, be sure to generate a PDF.
Verify that you have only used Truetype or PostScript fonts or typographies (if your document includes images imported from illustrator, verify that all fonts used in the illustrator document are vectorized).

